- General Properties of Waves
- What Waves Actually Do - Energy Transfer
- Seeing Wave Motion in Action
- The Parts of a Wave - Wave Features
- The Wave Speed Equation
- Types of Waves - Transverse and Longitudinal
- How Waves Behave - Wave Properties in Action
- The Ripple Tank - A Tool for Studying Waves
- Putting It All Together - Understanding Wave Behavior
General Properties of Waves #
IGCSE Physics Topic 3.1 – Understanding how waves work and what they can do
What Waves Actually Do – Energy Transfer #
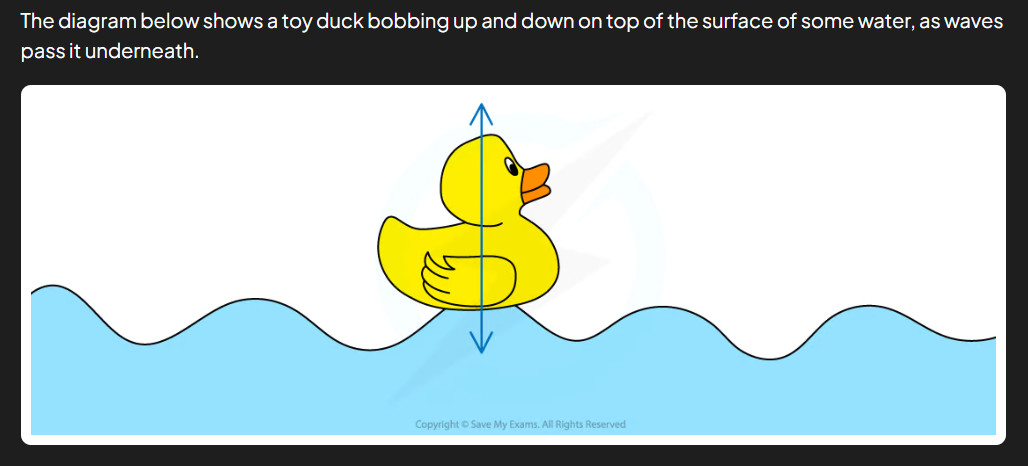
When you watch waves in water, it looks like the water is moving toward the shore. But if you put a cork on the water surface, you’ll notice something interesting – the cork doesn’t get carried along with the wave. Instead, it bobs up and down as each wave passes under it. The wave carries energy across the water, but the water itself stays roughly in the same place.

The same thing happens with sound waves traveling through air. When someone speaks to you from across a room, the sound energy travels to your ears, but the air molecules don’t rush across the room toward you. Each air molecule just vibrates back and forth in its local area, passing the energy along to the next molecule.
Seeing Wave Motion in Action #
Waves in Ropes and Springs #
When you hold one end of a rope and give it a sharp up-and-down flick, you create a wave pulse that travels along the rope to the other end. Watch carefully, and you’ll see that each part of the rope moves up and down, but the wave pulse travels horizontally along the rope. The rope doesn’t bunch up at the far end – instead, the energy you put in gets transmitted from one part of the rope to the next.
Springs work in a similar way, but they can show us two different types of waves. You can create waves that move up and down (like the rope), or you can push and pull the spring to create waves that compress and stretch along its length. Both carry energy, but they do it in different ways.
Water Wave Demonstrations #
Water waves are perfect for studying wave properties because you can easily see them and measure their characteristics. When you create waves in water, you can observe how they spread out in circles from the source, how fast they travel, and how they behave when they encounter obstacles.
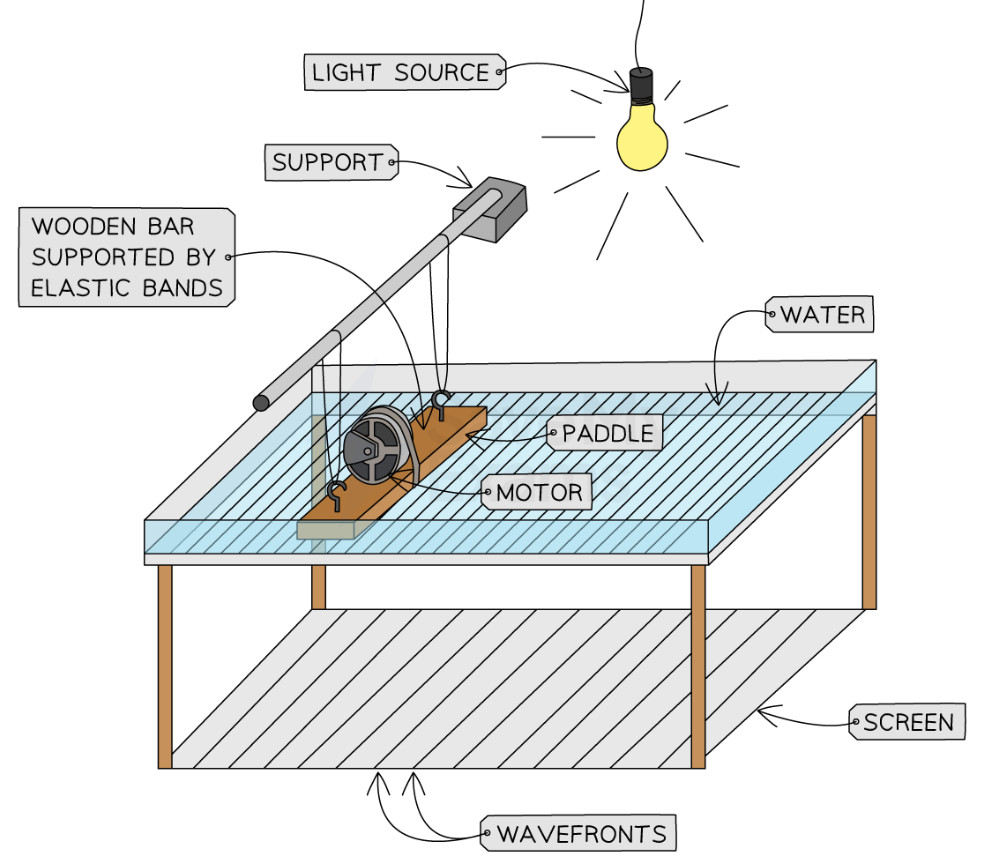
Scientists use special equipment called ripple tanks to study water waves in controlled conditions. These are shallow trays of water with lights that cast shadows of the waves onto a screen below, making it easy to see and measure wave patterns.
The Parts of a Wave – Wave Features #
Understanding Wavefronts #
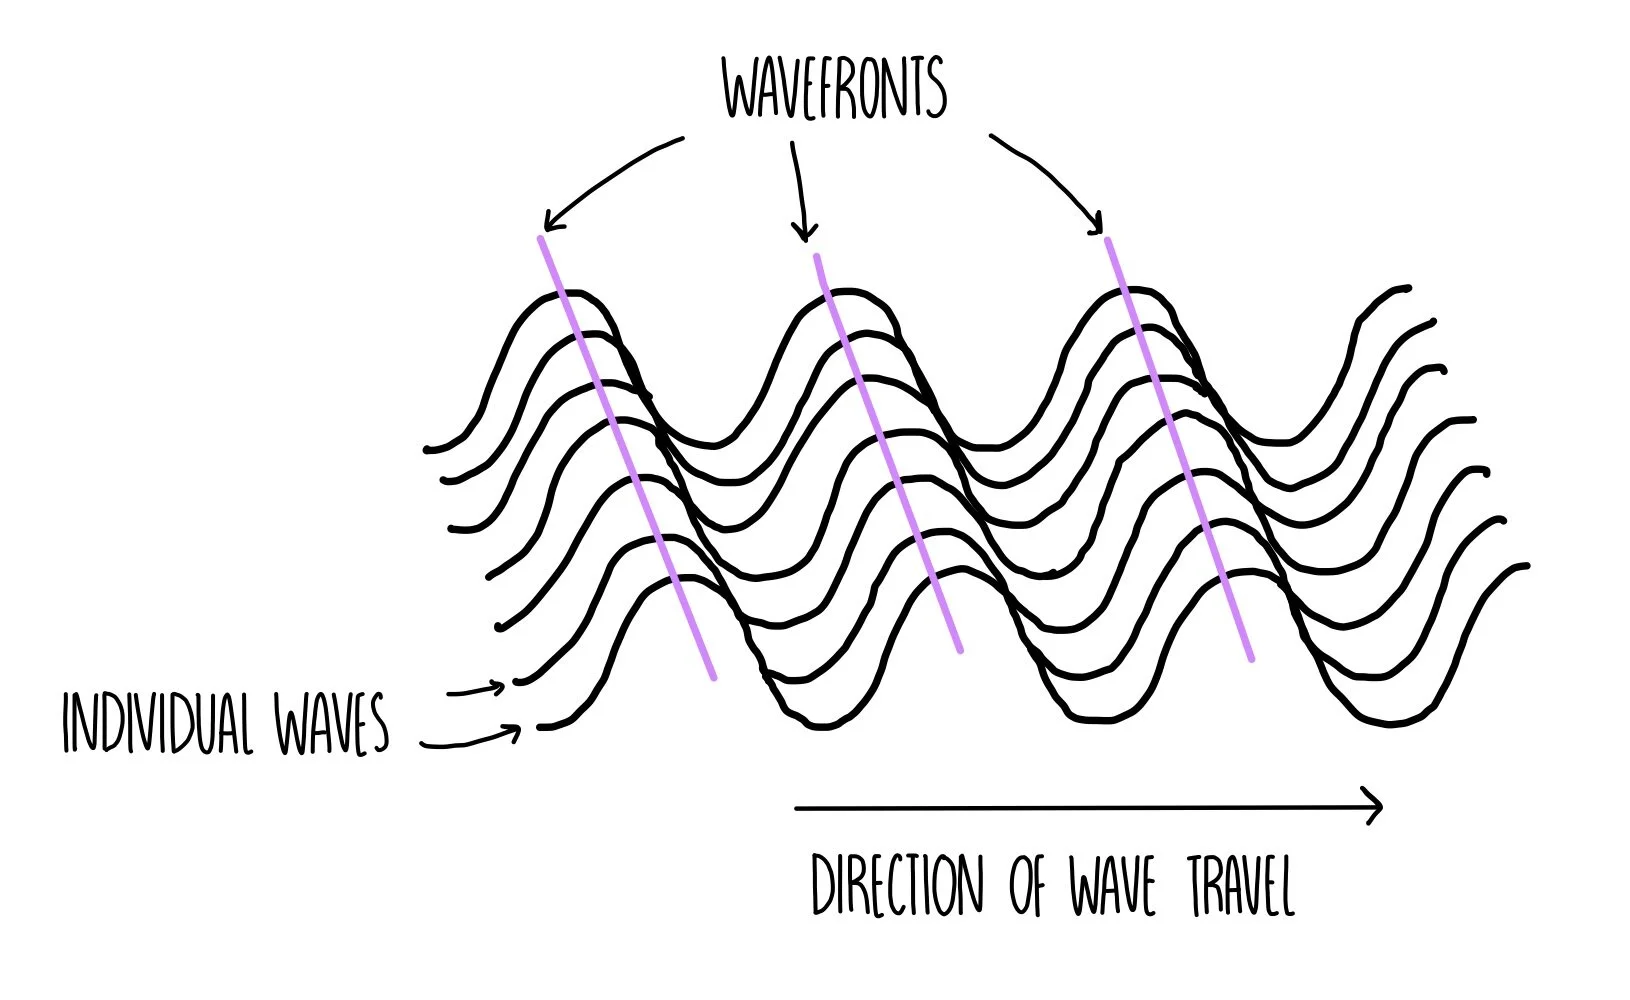
A wavefront is an imaginary line that connects all the points on a wave that are moving in the same way at the same time. Think of it like taking a snapshot of a wave and drawing a line through all the wave crests (high points) that you can see at that moment.
Wavefronts help us understand the direction waves are traveling. They’re always perpendicular (at right angles) to the direction of wave travel. When you drop a stone in water, the wavefronts are circular rings that spread outward from where the stone landed.
Wavelength – The Distance Between Repeats #
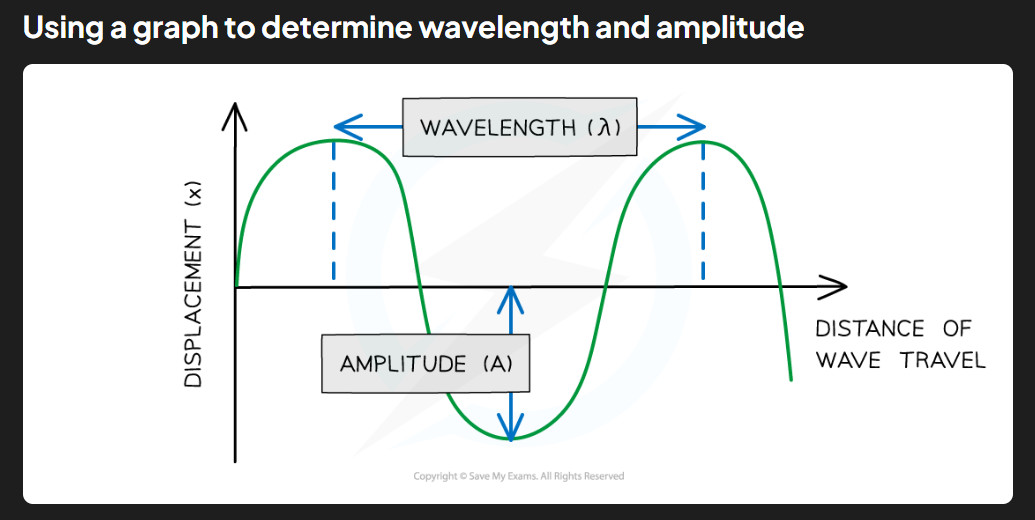
Wavelength is the distance between two identical points on a wave. The easiest way to measure it is from one wave crest (high point) to the next wave crest, or from one trough (low point) to the next trough. We use the Greek letter lambda (λ) to represent wavelength in equations.
Think of wavelength as how “stretched out” or “squashed together” the waves are. Long wavelengths mean the waves are spread far apart, while short wavelengths mean they’re close together. This affects many properties of the wave, including how it behaves when it encounters obstacles.
Amplitude – The Height of the Wave #
Amplitude measures how far the wave moves from its resting position. For water waves, it’s the height from the still water level to the crest (or the depth to the trough). For sound waves, it’s how far the air molecules move back and forth from their normal positions.
Amplitude is directly related to the energy of the wave. Bigger amplitude means more energy. This is why large ocean waves are more powerful than small ripples, and why loud sounds can damage your hearing while quiet sounds cannot.
Frequency – How Often Waves Repeat #
Frequency tells us how many complete waves pass a particular point in one second. If you stood by the shore and counted how many wave crests hit your feet in one second, you’d be measuring the frequency. We measure frequency in hertz (Hz), where 1 Hz means one wave per second.
Frequency is closely related to the energy of the wave. Higher frequency waves carry more energy than lower frequency waves. This is why high-frequency sound waves (high-pitched sounds) can sometimes break glass, while low-frequency sounds (low-pitched sounds) cannot.
Wave Speed – How Fast the Energy Travels #
Wave speed is how fast the wave energy moves from one place to another. This is different from how fast the particles in the medium are moving. For example, in water waves, the wave might travel at 2 meters per second across the water surface, but the water particles themselves are just moving up and down in small circles.
Wave speed depends on the properties of the medium the wave is traveling through. Sound waves travel much faster through steel than through air because steel is denser and more rigid. Light waves travel fastest in empty space and slower when passing through materials like glass or water.
The Wave Speed Equation #
The Wave Equation:
Where:
$v$ = wave speed (meters per second, m/s)
$f$ = frequency (hertz, Hz)
$\lambda$ = wavelength (meters, m)
This equation tells us that wave speed equals frequency multiplied by wavelength. It makes sense when you think about it: if waves are coming more frequently (higher frequency) or if each wave is longer (bigger wavelength), then more wave energy will pass a point in each second, so the wave speed will be higher.
Worked Example 1: Finding Wave Speed #
Problem: Water waves have a frequency of 2 Hz and a wavelength of 1.5 m. What is their speed?
Step 1: Write the formula
$v = f\lambda$
Step 2: List what we know
$f = 2 \text{ Hz}$
$\lambda = 1.5 \text{ m}$
$v = ?$
Step 3: Substitute values
$v = 2 \times 1.5$
Step 4: Calculate
$v = 3 \text{ m/s}$
Answer: The wave speed is 3 m/s
Worked Example 2: Finding Wavelength #
Problem: Sound waves travel at 340 m/s and have a frequency of 500 Hz. What is their wavelength?
Step 1: Write the formula and rearrange
$v = f\lambda$, so $\lambda = \frac{v}{f}$
Step 2: List what we know
$v = 340 \text{ m/s}$
$f = 500 \text{ Hz}$
$\lambda = ?$
Step 3: Substitute values
$\lambda = \frac{340}{500}$
Step 4: Calculate
$\lambda = 0.68 \text{ m}$
Answer: The wavelength is 0.68 m
Types of Waves – Transverse and Longitudinal #
Transverse Waves #
Particles vibrate at right angles (perpendicular) to the direction of wave travel
Longitudinal Waves #
Particles vibrate parallel to (in the same direction as) the wave travel
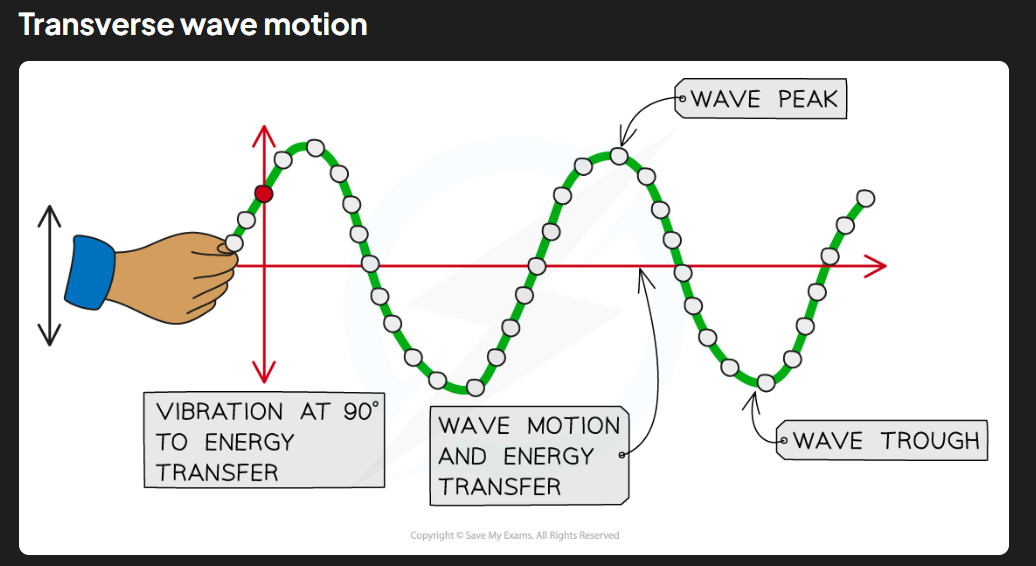
Transverse Waves – Sideways Vibrations #
In transverse waves, the particles of the medium vibrate at right angles to the direction the wave is traveling. Think of the rope example from earlier – when you flick the rope up and down, the wave travels horizontally along the rope, but each part of the rope moves vertically up and down. The particle motion is perpendicular to the wave direction.
Transverse waves have the familiar wave shape with crests and troughs that we usually think of when we picture waves. This shape makes them easy to draw and measure, which is why many wave diagrams show transverse waves even when explaining general wave properties.
- Electromagnetic waves: Light, radio waves, X-rays, microwaves – all light-type waves
- Water waves: The waves you see on the surface of water (though water motion is actually more complex)
- Seismic S-waves: Secondary earthquake waves that shake the ground sideways
- Waves on strings: Guitar strings, rope waves, any wave on a stretched material
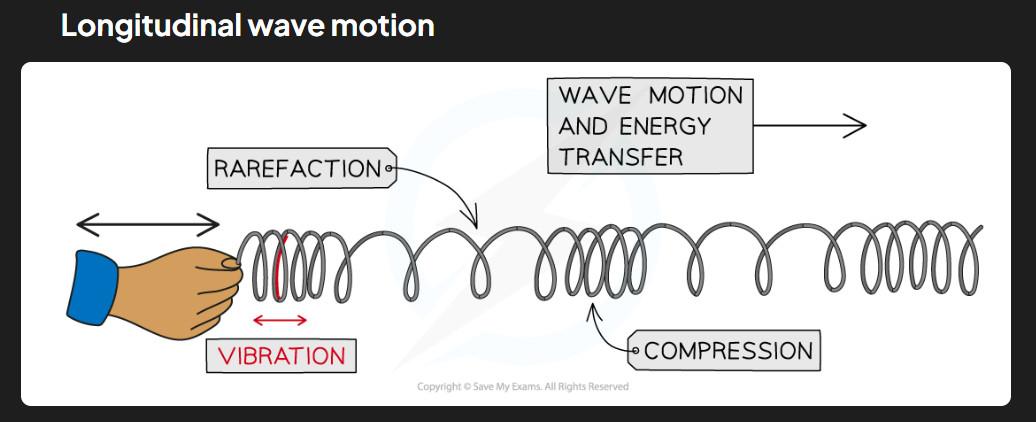
Longitudinal Waves – Back-and-Forth Vibrations #
In longitudinal waves, particles vibrate parallel to the direction of wave travel. Instead of moving up and down, they move back and forth in the same direction the wave is going. This creates areas where particles are pushed together (called compressions) and areas where particles are spread apart (called rarefactions).
Longitudinal waves don’t have the familiar up-and-down wave shape. Instead, they look like areas of bunched-up material alternating with areas of stretched-out material. This can make them harder to visualize, but they’re just as important as transverse waves.
- Sound waves: All sound travels as longitudinal waves through air, liquids, and solids
- Seismic P-waves: Primary earthquake waves that compress and stretch the ground
- Ultrasound waves: High-frequency sound waves used in medical imaging
- Pressure waves in fluids: Waves traveling through gases and liquids
How Waves Behave – Wave Properties in Action #
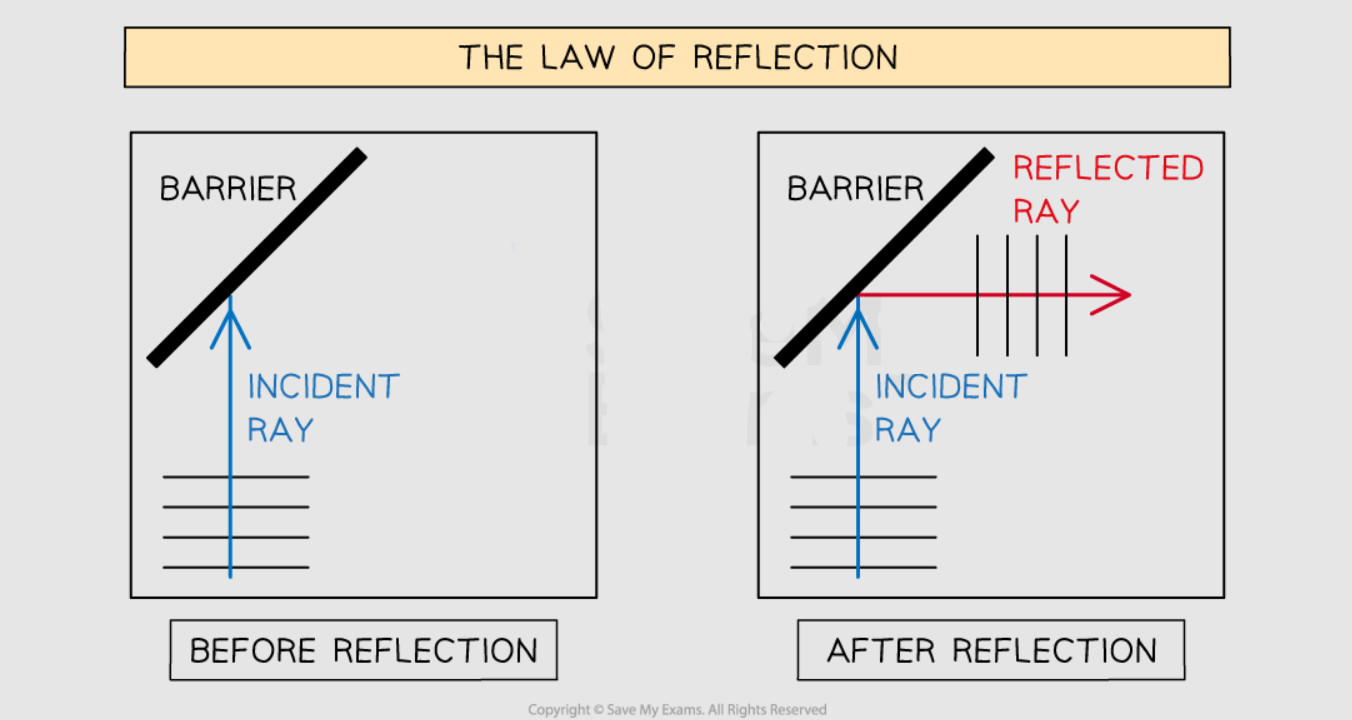
Reflection – Waves Bouncing Back #
When a wave hits a surface and bounces back, we call this reflection. The wave doesn’t disappear or get absorbed – instead, it changes direction and travels back toward where it came from. You see this every time you look in a mirror (light waves reflecting) or hear an echo (sound waves reflecting).
There’s an important rule for reflection: the angle at which the wave hits the surface (called the angle of incidence) equals the angle at which it bounces off (called the angle of reflection). This is why you can predict exactly where you need to aim a ball to bounce it off a wall and hit a target.

Reflection happens because when a wave reaches a boundary, the energy has to go somewhere. If the boundary is rigid (like a wall), the wave energy bounces back. The boundary acts like a barrier that the wave cannot pass through, so it returns in the opposite direction.
Refraction – Waves Changing Speed and Direction #
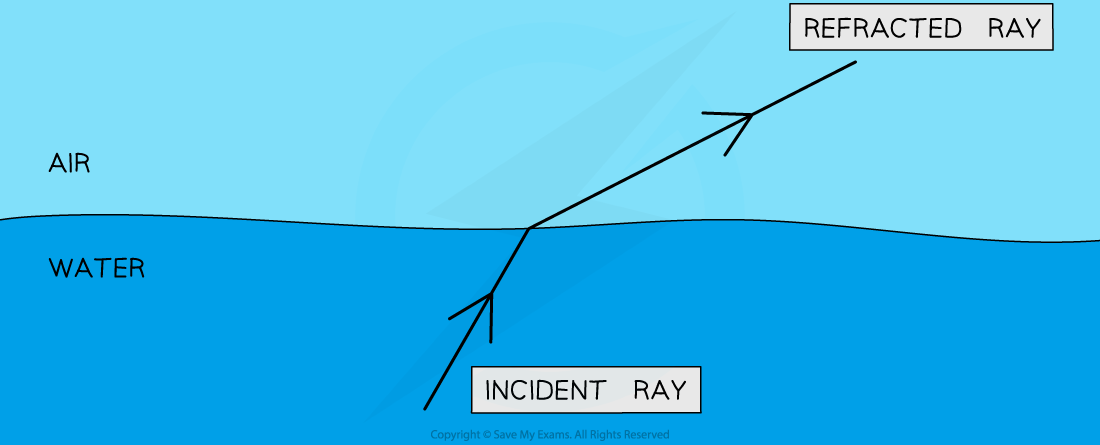
Refraction happens when a wave moves from one medium to another and changes speed. When the speed changes, the direction of the wave usually changes too (unless it’s traveling straight into the new medium). This is why a straw looks bent when you put it in water, or why swimming pools look shallower than they really are.
The key to understanding refraction is that waves always try to take the path that gets them to their destination in the least time. When waves slow down as they enter a new medium, they bend toward the normal (an imaginary line perpendicular to the boundary). When they speed up, they bend away from the normal.
Different waves refract by different amounts depending on how much their speed changes. This is why white light splits into rainbow colors when it passes through a prism – each color of light slows down by a slightly different amount in glass, so each color bends by a different angle.
Diffraction – Waves Bending Around Obstacles #
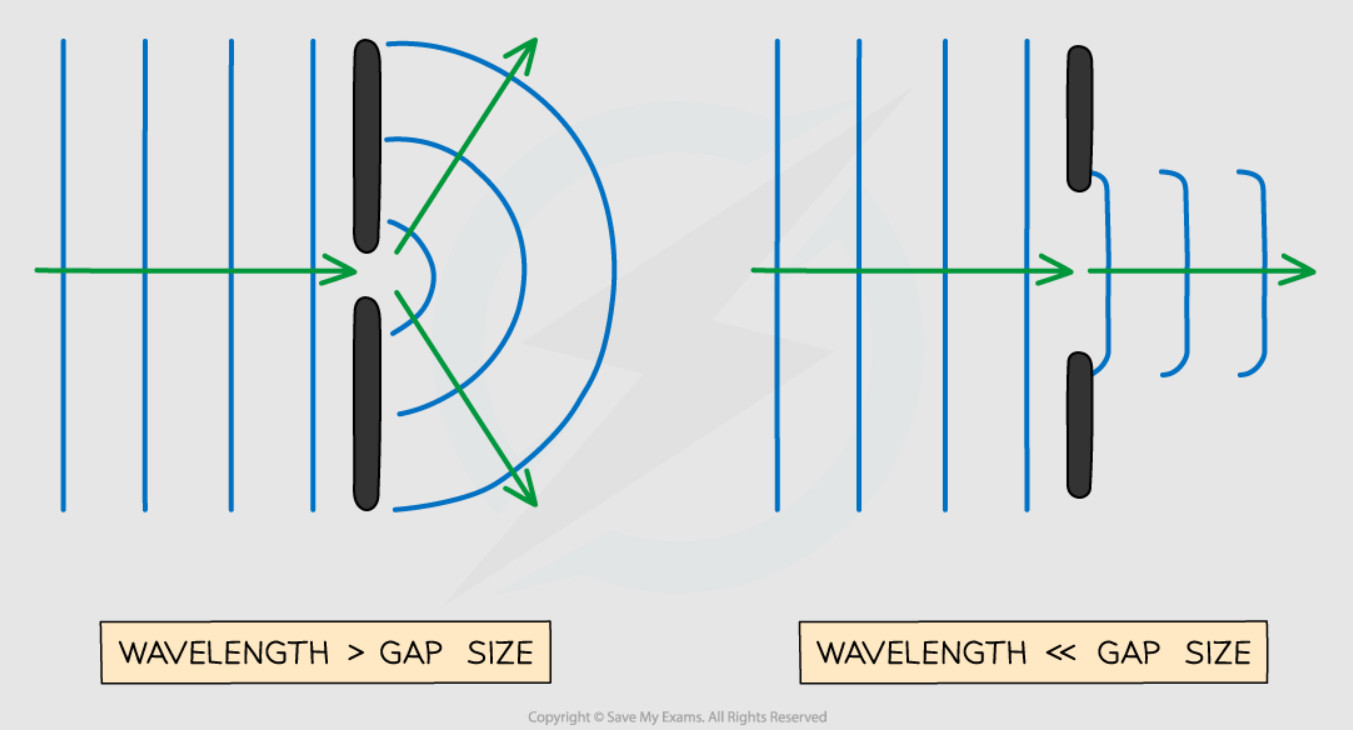
Diffraction is the ability of waves to bend around obstacles or spread out when they pass through gaps. This is why you can hear someone talking even when they’re around a corner from you, or why radio waves can reach areas that seem to be blocked by buildings.
The amount of diffraction depends on the relationship between the wavelength of the wave and the size of the obstacle or gap. When the wavelength is similar to or larger than the obstacle, you get significant diffraction. When the wavelength is much smaller than the obstacle, there’s very little diffraction.
This explains why sound waves (which have relatively long wavelengths) can easily bend around furniture and corners, while light waves (which have very short wavelengths) create sharp shadows behind objects. The diffraction effect is much stronger for sound than for light in most everyday situations.
The Ripple Tank – A Tool for Studying Waves #
What We Can Study with Ripple Tanks #
Ripple tanks are perfect for demonstrating all the wave behaviors we’ve discussed. Since water waves are easy to create and control, we can set up experiments to show reflection, refraction, and diffraction clearly. The visual nature of the setup makes it much easier to understand these concepts than trying to imagine them with invisible waves like sound or light.
Reflection in the Ripple Tank #
To study reflection, we place a straight barrier (like a metal strip) in the water. When waves hit this barrier, they bounce back following the law of reflection. We can clearly see both the incoming waves and the reflected waves, and measure the angles to confirm that the angle of incidence equals the angle of reflection.
We can also use curved barriers to show how reflection works with different shapes. A curved barrier can focus reflected waves to a point (like a concave mirror) or spread them out (like a convex mirror).
Refraction in the Ripple Tank #
To demonstrate refraction, we create regions of different water depth in the tank. Waves travel slower in shallow water than in deep water. When waves move from deep water to shallow water (or vice versa), they change speed and direction, showing clear refraction.
We can use a piece of clear plastic or glass placed in the tank to create a shallow region. When waves pass over this “shallow” area, we can see them slow down and bend toward the normal line. This clearly demonstrates how wave speed changes cause refraction.
Diffraction in the Ripple Tank #
For diffraction experiments, we create obstacles and gaps in the water. We can use barriers with small openings to show how waves spread out after passing through gaps. When the gap is similar in size to the wavelength, we see strong diffraction with waves spreading out in semicircular patterns behind the gap.
We can also place objects in the water to act as obstacles. When waves encounter these obstacles, they bend around them, creating wave patterns in the “shadow” region behind the obstacle. This shows how waves can reach areas that seem blocked by the obstacle.
Putting It All Together – Understanding Wave Behavior #
Why Wave Properties Matter in Real Life #
Understanding wave properties isn’t just academic – it explains many things you experience every day. When you listen to music, sound waves of different frequencies and amplitudes create the different notes and volumes you hear. When you see colors, you’re detecting light waves of different wavelengths that your eyes interpret as different colors.
The wave behaviors we studied also have practical applications. Reflection of light waves makes mirrors and telescopes possible. Refraction of light waves is used in glasses, contact lenses, and cameras to focus light properly. Diffraction of radio waves allows radio signals to reach areas that seem blocked by mountains or buildings.
Common Wave Behaviors You Can Observe #
Once you know what to look for, you can spot wave behaviors everywhere. Echoes in large buildings show reflection of sound waves. The way objects look different underwater demonstrates refraction of light waves. The fact that you can hear traffic noise even when you can’t see the road shows diffraction of sound waves around buildings.
- Echoes: Sound wave reflection in tunnels, large rooms, or mountains
- Mirages: Light wave refraction in hot air creating false images
- Rainbow colors in prisms: Light wave refraction separating white light
- Radio reception behind buildings: Radio wave diffraction around obstacles
- Water waves at the beach: All wave properties visible in ocean waves
Key Relationships to Remember #
The most important relationship in wave physics is the wave equation: $v = f\lambda$. This connects wave speed, frequency, and wavelength for any type of wave. Remember that if one quantity changes, at least one of the others must change too to keep the equation balanced.
Also remember the connection between wave properties and energy. Higher amplitude waves carry more energy (bigger ocean waves are more powerful). Higher frequency waves also carry more energy (which is why high-frequency sounds can be damaging). Understanding these energy relationships helps explain why different waves have different effects.
Remember the Wave Equation:
This single equation is the foundation for solving most wave problems. Make sure you can rearrange it to find any of the three variables when you know the other two.


