Table of Contents
What are Ionic Bonds? #
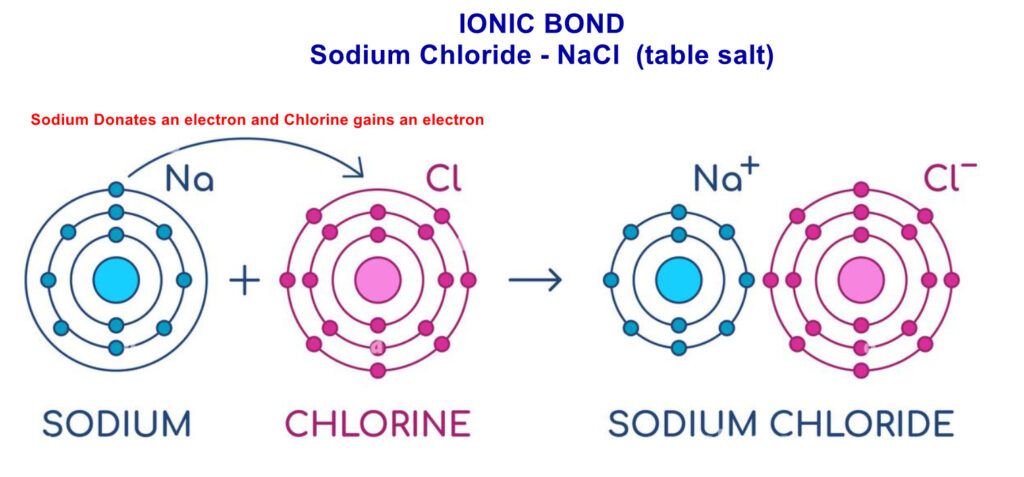
Ionic bonds form when electrons are transferred from a metal atom to a non-metal atom, resulting in the formation of oppositely charged ions. These ions are then held together by strong electrostatic forces of attraction.
- Metal atoms lose electrons to form positively charged ions (cations).
- Non-metal atoms gain electrons to form negatively charged ions (anions).
Why Do Ionic Bonds Form? #
Atoms form ionic bonds to achieve a stable electronic configuration (full outer shells), similar to the noble gases. This is achieved by:
- Electron Transfer: Metals lose electrons while non-metals gain electrons.
- Charge Attraction: The resulting +positive and -negative atoms are strongly attracted to each other due to opposite charges.
Characteristics of Ionic Bonds #
- Formed Between: Metals and non-metals.
- Bond Strength: Strong due to the electrostatic forces of attraction.
Examples of Ionic Bonds in Daily Life #
- Table Salt (NaCl): Sodium (Na) transfers one electron to chlorine (Cl), forming Na⁺ and Cl⁻ ions.
- Calcium Chloride (CaCl₂): Used in de-icing roads, formed by Ca²⁺ and Cl⁻ ions.

How to Draw Ionic Bond Dot & Cross Diagrams #
A dot and cross diagram shows how electrons are transferred in an ionic bond. It uses dots and crosses to represent the outer electrons of different atoms, illustrating how a metal loses electrons to become a positive ion and a non-metal gains them to become a negative ion. The resulting charged ions are held together by electrostatic attraction.
Follow these steps #
- Understand Ionic Bonding:
- Metals lose electrons and become positive ions.
- Non-metals gain electrons and become negative ions.
- Steps to Draw:
- Metal Atom:
- Draw its outer electrons as dots or crosses.
- Show the electron(s) being transferred to the non-metal.
- Write the metal ion with its charge (e.g., Na⁺, Mg²⁺).
- Non-Metal Atom:
- Draw its outer electrons (different symbol from the metal).
- Add the electron(s) gained from the metal.
- Enclose it in brackets with its charge (e.g., [Cl⁻]).
- Metal Atom:
- Add Arrows:
- Use arrows to show electron transfer from the metal to the non-metal.


